
How Does a Gas Regulator Work Diagram? (2026)
How does a gas regulator work diagram show what is happening inside a regulator when gas flows?
This article gives a clear cutaway diagram and a simple step‑by‑step view. It explains the force balance and a plain formula so you can see how outlet pressure is set.
You will also get labeled parts, materials and common failures. The guide covers single‑stage vs dual‑stage, performance under load, and real troubleshooting tips.
Diagrams are clear and captions use the exact keyword so you can find them fast. Read on for easy instructions on setting, testing, and keeping a regulator working safely.
How Does a Gas Regulator Work? (Diagram + Cutaway Step‑by‑Step)
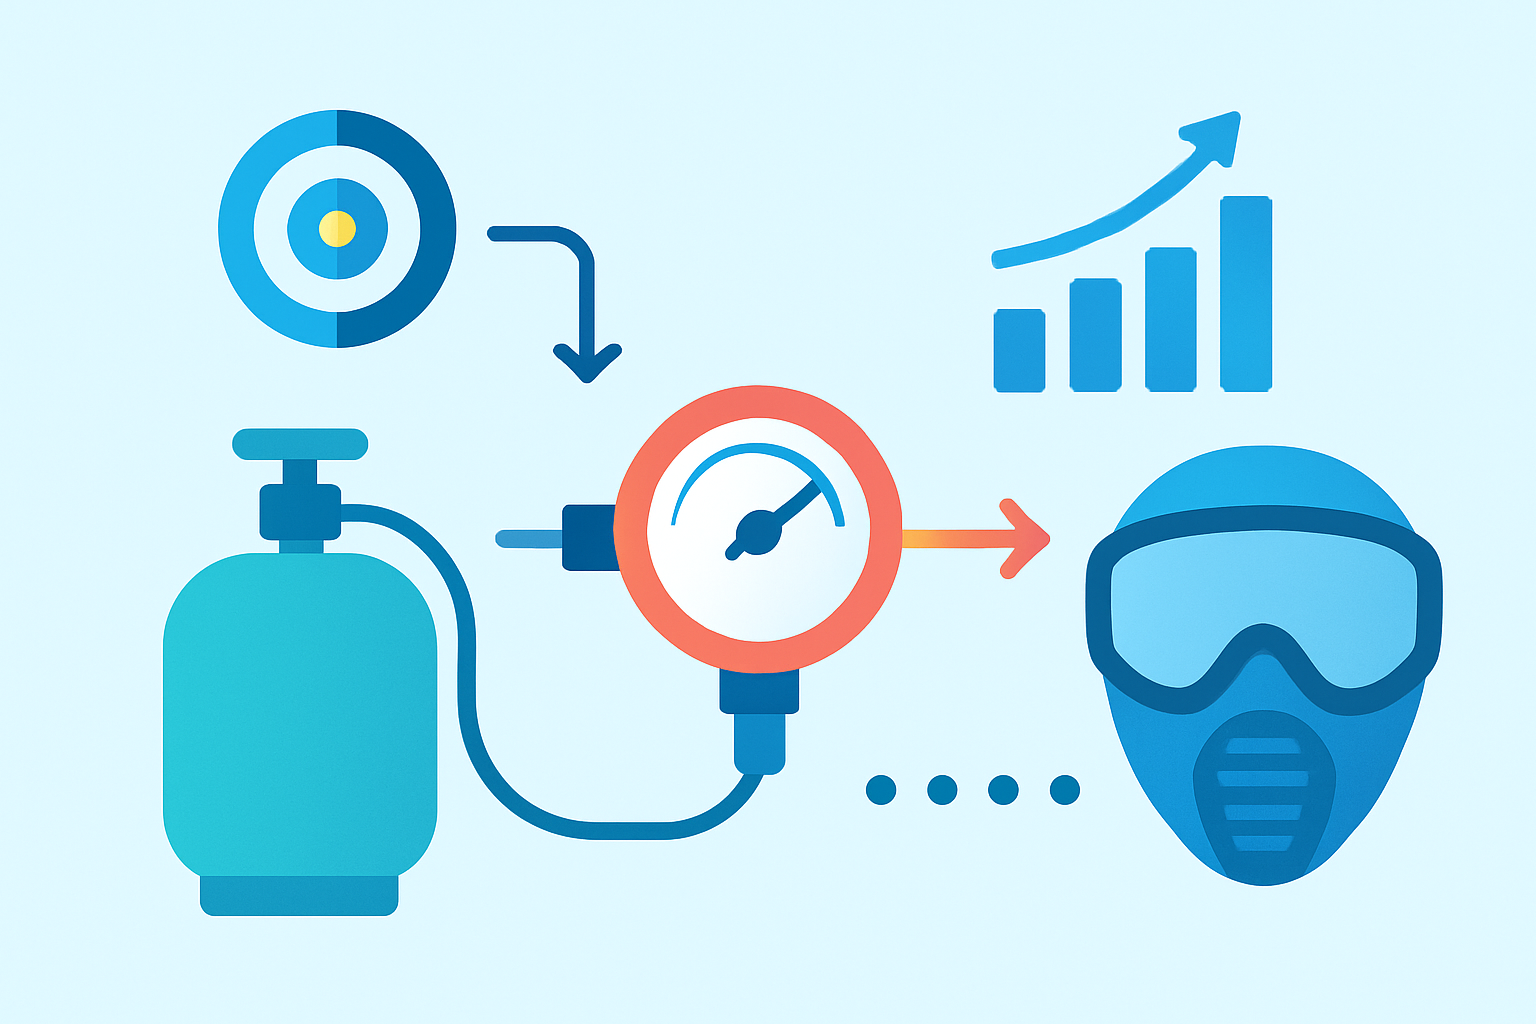
How does a gas regulator work — cutaway diagram
If you searched how does a gas regulator work diagram, this cutaway lays the mechanism out in plain steps. The visual and the numbered callouts make it much easier to follow than words alone.
The diagram uses eight callouts: (1) inlet, (2) orifice/seat, (3) valve/poppet, (4) diaphragm sensing chamber, (5) spring/adjuster, (6) outlet, (7) vent/relief, plus flow arrows showing direction. Keep those numbers in mind as we walk through what happens when gas flows and when demand changes.
Step 1: high‑pressure gas enters the inlet (1) and tries to pass the orifice/seat (2). The valve or poppet (3) sits on the seat and controls how much gas gets through to the downstream side.
Step 2: downstream pressure pushes on the diaphragm (4) in the sensing chamber and that pressure acts against the spring preload (5). The spring sets a target force so the diaphragm and spring fight until the forces balance.
How it works (force‑balance): P_out ≈ F_spring / A_diaphragm. This non‑technical formula means the outlet pressure is roughly the spring force divided by the diaphragm area, and it is an approximation because flow dynamics and small leaks affect the true value.
As demand increases the diaphragm moves and the valve opens more to restore balance; when demand drops the spring pushes the valve toward the seat and pressure returns to setpoint. Turning the adjustment screw changes spring preload at callout (5), so clockwise raises outlet pressure and counterclockwise lowers it.
If inlet pressure gets very high and the regulator cannot hold the outlet, the vent/relief path (7) allows a controlled escape of excess gas to protect the downstream system. Also note end‑of‑tank effects: as supply pressure falls the internal force balance can shift, so outlet may drift unless the regulator design compensates for inlet changes.
Key Components (Labeled Diagram) — What Each Part Does
The inlet and filter bring gas into the regulator and trap debris that would damage the seat or diaphragm. Typical materials are brass or stainless ports with sintered bronze or mesh filters; if the filter clogs the regulator will starve so clean or replace it routinely.
The seat and orifice form the throttling point and are usually brass or hardened steel to resist erosion from flowing gas. Debris or erosion here causes leaks or instability, so careful cleaning and replacing worn seats is a common maintenance step.
The valve or poppet is the moving plug that seals on the seat and is often stainless or plated for smooth action. A sticky or nicked poppet causes hysteresis or chatter, so inspect and lightly clean sealing surfaces when performance drifts.
The diaphragm senses downstream pressure and moves the valve via the mechanical linkage; diaphragms are made from elastomers such as NBR, EPDM or Viton chosen for compatibility with the gas. Diaphragms can crack, harden, or swell, so check for brittleness and replace per the manufacturer, and never use petroleum lubricants on oxygen‑service materials.
The spring and adjusting screw set the target force and are typically stainless or alloy; springs can relax with age and adjusters can be misset. If a regulator loses its range the spring or adjuster parts should be replaced and the adjuster torque kept moderate to avoid damage.
The outlet and sense port feed regulated gas to your system and are where you attach a downstream gauge; these ports are normally brass and fitted for standard fittings. Connect a gauge to the sense port to tune and confirm the setpoint under load, and if you are tuning an airsoft HPA rig, see HPA for beginners for practical setup tips.
The vent or relief path is a safety route which releases small amounts of gas if the regulator goes above its safe range and must vent to a safe area. A blocked vent often causes pressure spikes or instability, so keep the vent clear and pointed away from people and equipment.
The body is commonly brass or stainless for corrosion resistance and the seals are elastomer O‑rings chosen for the gas type. Hardened, nicked or dried‑out O‑rings are frequent failures; replace seals during scheduled maintenance and keep spares on hand.
Single‑Stage vs Dual‑Stage Regulators — Diagrams, Pros & Cons, When to Use Which
A single‑stage regulator reduces pressure in one action with a single force‑balance element between inlet and outlet. It is compact and simple but its outlet can change as inlet pressure swings during tank depletion or heavy flow.
A dual‑stage regulator uses two reduction stages: the first stage drops pressure partway and the second stage makes the final, fine adjustment. That intermediate reduction buffers the second stage from large inlet swings so the final outlet stays much steadier under varying supply pressure.
Single‑stage advantages are simplicity, lower cost and lighter weight, making them fine for stable inlet systems, short runs or non‑critical tasks. Dual‑stage advantages are much improved stability and lower droop for precision needs like long HPA runs; for a practical HPA example consult the MRS manual.
Choose based on how much outlet stability you need, the acceptable droop amount, peak flow demand, and your budget; select single‑stage for low cost and simple needs, and dual‑stage for precision or long continuous use. For airsoft and lab uses, dual‑stage is often worth the extra cost when setpoint stability matters.
Performance Under Load: Flow, Droop, Hysteresis, Temperature and Supply Effects
When you draw flow from a regulator its outlet typically changes; two key behaviors to watch are droop and hysteresis. Droop describes how outlet pressure falls as flow increases and appears as a slope downward on a pressure vs flow plot.
Hysteresis is the gap between the rising‑flow trace and the falling‑flow trace and is usually caused by seat friction or diaphragm stick and release. Both droop and hysteresis matter when you need repeatable pressure under changing demand.
The pressure vs flow curve below shows droop and the small hysteresis loop where rising and falling flows differ. The solid trace is one direction and the dashed trace is the opposite, and together they show how pressure changes with load.
Check datasheets for performance numbers: accuracy is often shown as ±% of setpoint or ±psi, and droop is shown as psi drop at rated flow so you can compare models. Hobby and industrial regulators publish these specs to help match selection to need.
Temperature shifts change seal stiffness, spring rates and gas density, so expect pressure change with ambient temperature and be cautious with liquefied gases like CO2 or propane that can vaporize unpredictably. Use parts rated for your temperature range and choose elastomers compatible with the gas to reduce surprises.
Some single‑stage regulators will actually let the outlet climb as supply pressure falls because the internal balance of forces changes when inlet pressure drops; the valve may open slightly more before the diaphragm reacts. A dual‑stage design avoids this by staging the reductions so the final stage sees a near‑constant input and holds the setpoint steady.
To measure droop and hysteresis, step the flow in fixed increments, record the outlet pressure at each step while increasing and then decreasing flow, and plot the results. This simple test mirrors steps in how does a gas regulator work diagram and shows the real behavior under your load conditions.
Practical Tips: Installation, Setting the Setpoint, Troubleshooting & Maintenance
Install the regulator with the correct orientation, an upstream shutoff valve, and a fitted inlet filter. Route the vent to a safe location, mount a downstream gauge at the sense port, and perform a leak check before placing the system into service.
To set the setpoint, attach and zero gauges, keep the downstream closed, slowly open the inlet and turn the adjuster toward the approximate pressure, then apply a realistic incremental load and recheck. Fine‑tune for droop under expected flow, lock the adjuster if the model allows, and document the final setting for future reference.
Common faults are straightforward: no output usually means a blocked inlet, closed valve or damaged diaphragm so check the inlet and listen for leaks with the gauge showing zero downstream. Low output or excessive droop points to an undersized regulator, clogged orifice, or worn diaphragm, while pressure spikes or instability often indicate a blocked vent or sticky seat and call for cleaning or seal replacement.
Inspect diaphragms and O‑rings on a routine schedule, keep spare seals and diaphragms on hand, and follow the manufacturer’s service intervals for full overhaul. For model‑specific maintenance and safety direction consult the STORM manual and always use regulators rated for the gas in question and the intended pressure and temperature ranges.
What People Ask Most
What does a gas regulator diagram show?
A gas regulator diagram shows the main parts and how gas moves through the device. It helps you see the inlet, outlet, valve, and safety features at a glance.
How does a gas regulator work diagram help me understand gas flow?
It illustrates the path gas takes and how pressure is reduced. Seeing the flow makes it easier to spot where problems might occur.
Can I use a gas regulator diagram to help with installation?
Yes, a clear diagram can guide basic installation steps and hose connections. Always follow the manufacturer instructions and local codes as well.
How do I read the parts labeled on a gas regulator diagram?
Start with the inlet and outlet, then identify the control valve and pressure relief. Labels usually match the physical parts so you can compare them side by side.
Are there common mistakes when following a gas regulator diagram?
People often confuse inlet and outlet or skip the safety relief lines. Double-check labels and orientations before making connections.
Does a gas regulator diagram show how to set pressure levels?
Some diagrams show where the adjustment screw is, but they rarely give exact settings. Use the diagram for location and refer to your appliance manual for correct pressure values.
Where can I find a clear how does a gas regulator work diagram?
Look in your regulator’s user manual or the manufacturer’s website for clear diagrams. Many instructional guides and videos also include simple, labeled diagrams for beginners.
Final Thoughts on How a Gas Regulator Works
If you wanted a clear, visual answer to how a gas regulator works, the diagrams and step‑by‑step cutaway gave it — showing the inlet, valve, diaphragm, spring and vent in one view, plus the simple force‑balance formula that predicts outlet pressure. You can see how a setpoint like 270 psi is set by spring preload and how the diaphragm moves to hold that pressure, so the core benefit is a predictable, steady outlet even as conditions change. We opened by asking for parts and process and closed by mapping each numbered callout and the pressure‑vs‑flow curve back to that promise.
One realistic caution: even a well‑made regulator can show droop, hysteresis, or odd outlet rises as supply pressure falls, so you’ll need to check vents, replace worn diaphragms, and size the unit properly. The piece flagged common failure modes and quick maintenance steps to keep things steady. It’s most useful to installers, HPA and lab users, and anyone who needs reliable, predictable pressure under load.
Armed with the cutaway, the boxed force‑balance explanation, and the setup checklist, you’ll be better able to pick, set, and keep a regulator performing as intended. With a little practice, you’ll get consistent results and fewer surprises going forward.